UK SHIP, NO TAX

Monday 19 June 2017

Diatronik SRS+DASH+CALC+EPS OBD Tool Installtion Guide

New arrive at OBDexpress.co.uk:Diatronik SRS+DASH+CALC+EPS OBD Tool with USB Dongle,Diatronik Support all renesas and Infineon airbag restore by OBD2 up to 2016; Support Dash mileage correction via OBD2;and better than CG100 PROG III
Support Airbag Calculator via USB;Diatronik have many more function like OBDII Diag, IMMO Tool, G-Prog in develop, will add later.
Here is the user manual for Diatronik SRS+DASH+CALC+EPS OBD Tool how to use,incl:
1. Install Software.
2. Settings.
3. Update
4. Calc Tool.
5. Work for OBD Module
6. Work with SRS Toyota-Subaru
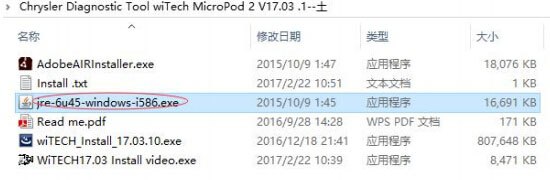
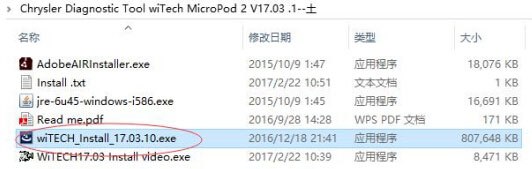
1. Install Diatronik Software
Operating system: Windows 7/Windows 10 above
After receiving the security key, you turn to your software supplier and he sends you an archive with the program files and license.
Unpack the archive to any convenient folder on your computer, insert the security key into the USB and you can run the program.
Driver for OBD adapter can be downloaded here
http://els27.ru/files/PL2303_Prolific_DriverInstaller_v1_12_0.zip
Included with the program is a program ELS27Baudrate.exe With her you can check and configure OBD2 adapter supplied,
please note that the speed of the adapter in this program, you need to set 2mb/s (2 000 000 ).
2. Settings
how-to-install-diatronik-srs-dash-eps-obd-tool-1
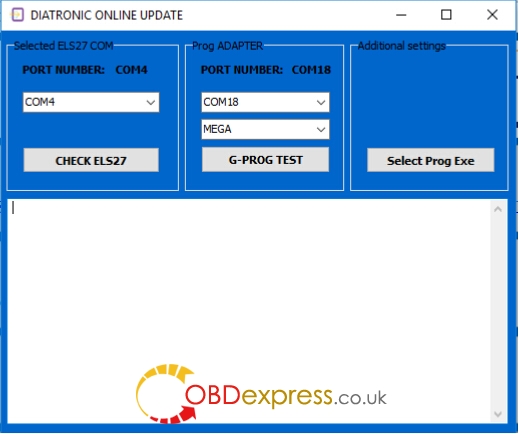
In the settings menu, select the COM PORT on our adapter, and close the window, when the window is closed, the program will create a ini file with the settings
and remember the port number. Button Select Prog Exe provides the flexibility of running third-party program programmer, to work with dumps.
3. Update Diatronik software
how-to-install-diatronik-srs-dash-eps-obd-tool-2
Update the program online in the menu ‘ONLINE’.
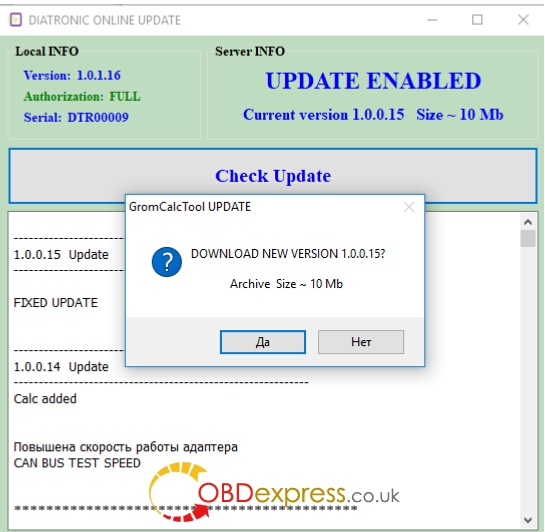
The program checks for updates, and when available offers download.
Updates are stored in the root directory of the program in the Update folder, if this folder you do not, the program will create it automatically.
Updates come out about 1 every 1-2 weeks
4. CalcTool
how-to-install-diatronik-srs-dash-eps-obd-tool-3
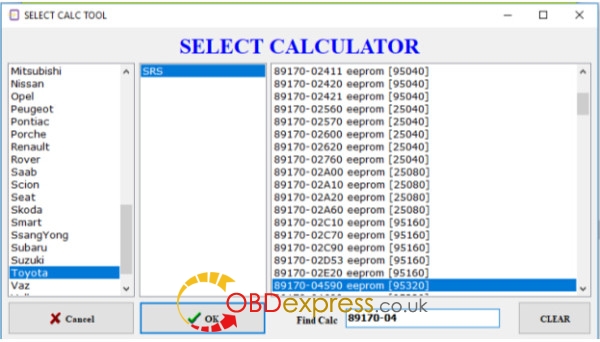
Menu CalcTool you can work with dumps ECU SRS and ODO.
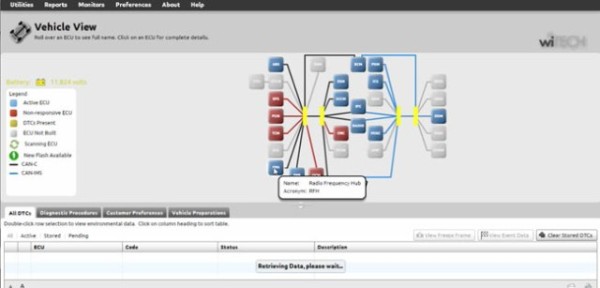
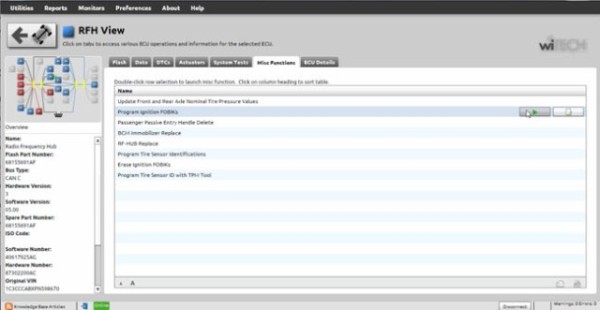
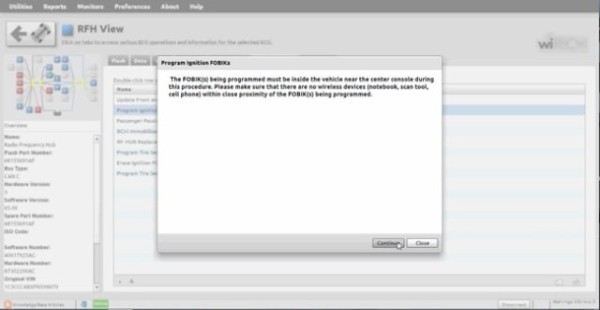
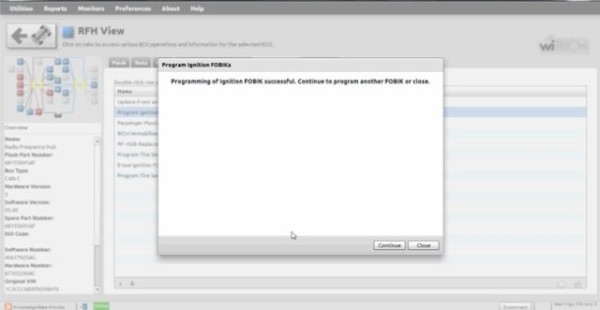
5. Work OBD Module.
how-to-install-diatronik-srs-dash-eps-obd-tool-4
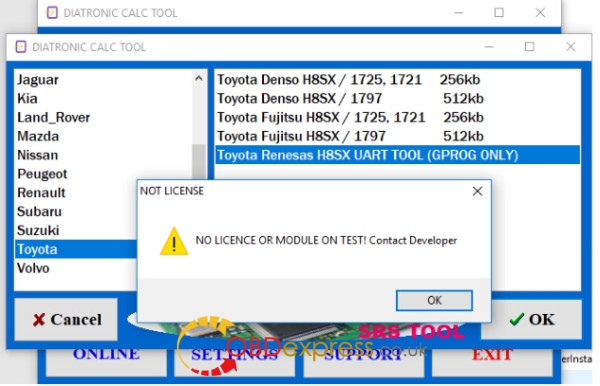
If the module you are seeing this message, it means that the module is still being tested and will soon be available.
All modules have built-in assistance for connecting and working with the module for the call, click the INFO button
6. Work SRS Toyota-Subaru SRS.
Work with blocks SRS TOYOTA – SUBARU is made in two stages, work mode and Boot Mode.
Work Mode.
In the work mode read and erase main flash memory and save it.
Reading is possible both on the table and in the car.
Boot Mode.
In Boot Mode it is writing to flash and erasing EEPROM, the data about the accident.
For unit transfer in boot mode, you must erase the flash in operating mode, connect RESET PIN of MCU with +5 volts through a resistor of 4,7-10kOm
how-to-install-diatronik-srs-dash-eps-obd-tool-5
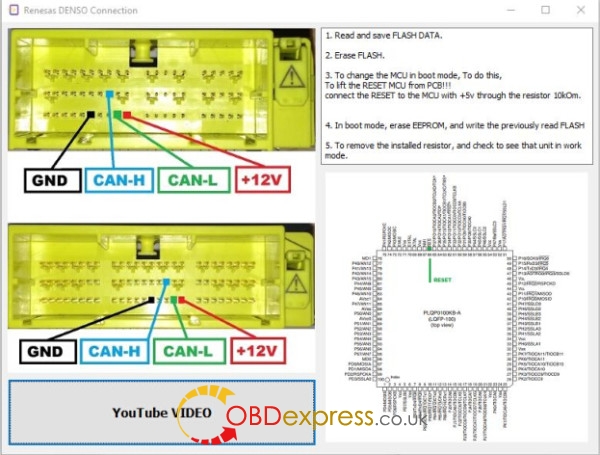
After writing flash, the resistor must be removed.

Thursday 8 June 2017

BMW INPA vs Rheingold

Topic 1: BMW INPA and Rheingold, which one should need?

All Rheingold versions have native support for Ediabas 7.x, this option just needs to be activated from istagui config file. I can check the parameter later. This means that K+DCAN can be used directly with Rheingold, as long as the Ediabas (which comes with BMW Standard Tools) is configured for this interfaces. Setting for Ediabas.ini can be found in Rheingold settings, under VCI tab (if the config file has been configured correctly). If the interface works with INPA or Tool32, then it works with Rheingold too.
ADS interface is not supported, as Rheingold requires Ediabas 7.x, and only Ediabas 6.x and older has ADS support. So to use Rheingold with ADS cars, ICOM is mandatory. ADS cars are E36, E34, beginning of E38 production and all chassis models that are older than these. E39, E46 and later E38, and all chassis models made after these are equipped with K-line or D-CAN, so K+DCAN cable (combinated interface that has both K-line and D-CAN) is good for these cars. F-series cars can useK+DCAN for diagnosis and ENET for diagnosis + coding and programming.
There are 20-pin connectors in engine compartment on all cars made approximately before year 2000, even if they have OBD-2 connector too. If there are both of these connectors available, then 20-pin must be used as OBD-2 is then connected only to DME/DDE and EGS. 20-pin connector type is K-line or ADS, depending on the chassis model. If it is K-line, then K+DCAN and obd-20pin adapter can be used.
There is also ADS interface available, it can be used with INPA on ADS cars. It can be found from E-bay, and it is called Tiny ADS. This ADS thing talks directly to COM-port i/o memory addresses, so laptop must have native COM port. USB-COM adapter will not work, period. Of course ICOM can handle these cars via ethernet connection, even with INPA. To configure ICOM to work with Ediabas, I-tool radar is used to check ICOM ip address and then EasyConnect can be used to configure ediabas and to lock the ICOM.

Note: How to activate Ediabas support in Rheingold:
Open ISTAGUI.exe.config with notepad
find line with parameter BMW.Rheingold.OperationalMode
change it to this:
<add key=”BMW.Rheingold.OperationalMode” value=”ISTA_PLUS”>


Topic 2: Which for diagnosis, and which for coding, programming?

If you want meaningful Diagnosis in English, for both E-Series and F-Series cars, you need ISTA/D (Rheingold) and you can request it here:
http://www.obdexpress.co.uk/wholesale/bmw-icom-software-hdd-ista-d-ista-p.html
For Coding, you need different Tools, NCS Expert / SP-Daten for E-Series and E-Sys / PSdZData for F-Series.
All Diagnosis and Coding can be done with cheap DCAN Cable for E-Series and cheap ENET Cable for F-Series.
For Programming (Flashing ECU’s with new Firmware), then you need ISTA/P for for both E-Series and F-Series cars, or you can use WinKFP for E-Series and E-Sys for F-Series. For E-Series Programming, you will need an ICOM, but for F-Series Programming, you can use ENET Cable.


Attachment:


Topic 3: INPA and ISTA/D (Rheingold), which one better?

ISTA/D (aka Rheingold) is the current dealership diagnostic software for all Exx and Fxx cars. ISTA/D is the replacement for older dealership DIS diagnostic software. Likewise, ISTA/P is the replacement for older delaership SSS Progman programming software. ISTA/P & ISTA/D are designed to be used with an ICOM Interface, and with full ICOM-A-B-C, you can connect to older cars. The ICOM “C” Connection is for the older BMW ADS 20-pin round “Pacman” connector in Engine Bay. You can find versions of ISTA/D with an ICOM Emulator builtin, that allows you to use it with an ENET Interface for Fxx cars and a DCAN Interface for Exx cars. I don’t know for sure, as I do not do any Exx work, but I doubt ICOM Emulator would work for older ADS connector.
INPA (interpreter for test procedures) is older factory floor diagnostic software, designed to run test procedures. While INPA can be set for English User Interface, most of the Test Procedures, which can be difficult to find, are in German.
Between the two, ISTA/D is simply a better option. It has a modern interface, is 100% English (or available in a multiple other languages), and is complete in that it does not require additional Test Procedures.
You can have ISTA/P & ISTA/D installed on a laptop aside INPA, WinKFP, and INPA without any issues.


Topic 4: BMW INPA and Rheingold diagnostic tool, where to get?

switch mode K+DCAN cable: E series diagnostics


Enet cable bmw: F series diagnosis, coding, programming
bmw-enet-ethernet-to-obd-interface
Bmw icom a2+b+c: E/F series diagnosis, coding, programming
wifi-bmw-icom-a2-b-c-diagnostic-programming-tool

Friday 2 June 2017

How to fres download v17.04.27 wiTECH

Chrysler, Jeep, Dodge diagnostic VCI interface wiTECH MicroPod 2 software updated!! here, free download wiTECH software v17.04.27 and get the how-to’s of wiTECH 2 app installation to install Chrysler wiTECH software yourself! Also, a wiTECH MicroPod 2 v17.04.27 user manual of key programming is attach here for you.

Part 1: v17.04.27 wiTECH download link:

It’s wiTECH software crack
No need password for wiTECH MicroPod 2 login
No need wiTECH software license

Tested OK by professionals @OBDexpress
Safe to use with wiTECH MicroPod 2 clone (item no. SP271-C only)

Operation system of wiTECH 2 download:
Windows XP;
Windows 7

THE MOST IMPORTANT NOTES:
  1. The date of the computer must be the same as the fact
  2. The computer must be connected to the Internet
  3. Connect the machine to the MicroPod 2 to open the wiTECH software
  4. The system may ask you to turn off the software and turn it on for registration again. Repeat it for several times. Then you can use it normally


Part 2: How to install wiTECH MicroPod 2 v17.04.27 software crack:

Step 1   install AdobeAIRInstaller.exe
Step 2   install jre-6u45-windows-i586.exe
Step 3   install wiTECH_Install_17.04.27.exe
Step 4   Restart the computer
wiTECH diagnostic tool is ready for use!


Part 3: How to use wiTech MicroPod II clone for auto key programming

Step 1
Plug the MicroPOD II device into the OBD port and connect the USB cable from the device to your laptop. This wakes the BUS on the car.
witech-micropod-2-v17-1
Step 2
Manually enter the VIN of the vehicle. This gives you access to the module list.  Select the RFH (Radio Frequency Hub) module. This is the module where the key is registered.
witech-micropod-2-v17-2
Step 3
Next select “Miscellaneous Functions,” then “Program Ignition Fobix.”  At this point, you are prompted to enter the VIN again, followed by the four-digit PIN Code.
witech-micropod-2-v17-04
Step 4
After the four-digit pin is entered you are prompted to hit continue to “Program Ignition FOBIK.” Once you hit continue you must press the UNLOCK button on the FOBIX within 30 seconds (the FOBIX needs to be located near the center console during this procedure).
witech-micropod-2-v17
Step 5
Programming of the Ignition FOBIX is now successful. The new key key is accepted into the car, and the ignition will now turn on and start the car. At this point, you also have the option to program a second key.

Part 3: How to use MicroPOD II clone for auto key programming

Step 1
Plug the MicroPOD II device into the OBD port and connect the USB cable from the device to your laptop. This wakes the BUS on the car.

Step 2
Manually enter the VIN of the vehicle. This gives you access to the module list.  Select the RFH (Radio Frequency Hub) module. This is the module where the key is registered.
micropod-ii-key-programming-1
Step 3
Next select “Miscellaneous Functions,” then “Program Ignition Fobix.”  At this point, you are prompted to enter the VIN again, followed by the four-digit PIN Code.
micropod-ii-key-programming-2
Step 4
After the four-digit pin is entered you are prompted to hit continue to “Program Ignition FOBIK.” Once you hit continue you must press the UNLOCK button on the FOBIX within 30 seconds (the FOBIX needs to be located near the center console during this procedure).
micropod-ii-key-programming-3
Step 5
Programming of the Ignition FOBIX is now successful. The new key key is accepted into the car, and the ignition will now turn on and start the car. At this point, you also have the option to program a second key.
micropod-ii-key-programming-4
Things to Remember:
  • You must be online to program the key.
  • The PIN Code is only good for one session, which lasts 72 hours. After 72 hours the pin code expires.
  • If you input the wrong code for three-time it locks the BCM and you cannot service the vehicle for 24 hours.
  • The key is one-time programmable. Once married to the vehicle it is locked to the car forever. The key can be erased from the car and put back into the same car, but can’t be switched to another car.
  • The placement of the key during initialization is important. It needs to be placed either behind the shifter or in the center console.