UCANDAS VDM is the best OEM-level diagnostic products, With it, you can read data stream, reading and clearing of diagnostic trouble codes, component activation and immobilizer key coding and so on.
VDM UCANDAS support multi-language,including English,German,French,Spanish, italian,Farsi,Portuguese,Japanese,Chinese Traditional,Chinese Simplified,Czech,Hungarian Arabic,Russian Global Edition,Finnish,Korean,Turkish,Vietnamese, Dutch
But Default language is English, if you need other language,how to change the language for VDM UCANDAS to the one you want?
1) If you need other language beside english, when you get the tool, please send your serail number and language to us, we will open the authorization for you.
2) After software authorization is opened. Then follow our software update video to download and install the update tool and other software
how to install WIFI UCANDAS full system VDM/OEM Automotive Diagnosis System
how to update WIFI UCANDAS full system VDM/OEM Automotive Diagnosis System
3) If you have doubts for language changing, here is the instruction for the video:
a. First you will see to go official website to download the update tool.
b. After you get the notification of your software language is opened. Install the update tool and connect VDM to PC. After PC read the VDM machine, Click update.
[This is the downloaded update tool]
c. You will enter the interface needs you fill in your information. Then register your information. (Keep remember these information, if you use wrong register information to log in the official website in the future, it will meet error prompt)
d. In the upper right corner of update interface, after your software is opened ready, you can choose the language you want to download. Then your car software will be downloaded and installed as the language you choose. (This language is for car software. Attention: Language for Car model software and software operation menu is different. Do mot garble it. Only this two language are the same, it will display the car model. Otherwise it will not show any car model after download.)
e. Back to the update tool, you will see the operation language menu. Setup this language to the one you want. Then all the language will be set to the one you want.
[language setup on update tool]
[Click this update menu, then you will enter update interface]
f. There are two uses for update tool: if you do not have the car list, then it is the update tool. After you download the car software and install it ready, then it is the diagnose software.
Friday, 29 April 2016
Tuesday, 26 April 2016
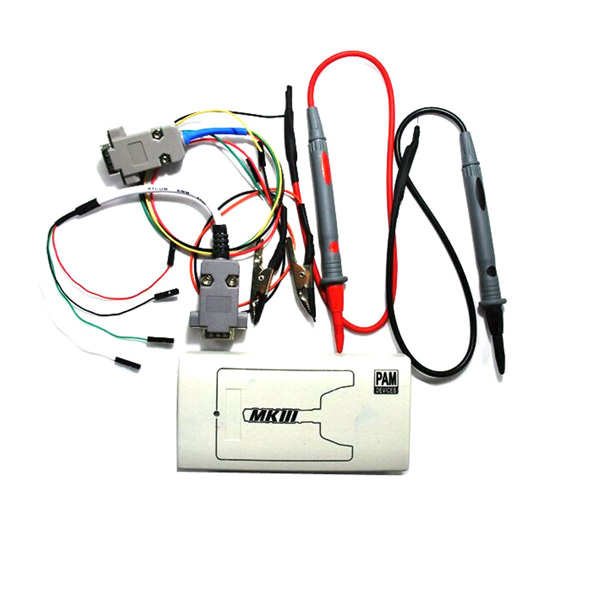
MasterKeyIII MK3 for Renew Used Electronic Keys New released
MK3 Key Programmer is the only one tool in the world can renew used keys. Especially Toyota and Lexus Smart key H Type, Even Tango do not have it.
Now you can get MasterKeyIII MK3 for only €1,834 in www.obd2express.co.uk.
To Get MK3 Key Programmer For 4 Reasons
1,The MasterKeyIII is a device and a software for programming and copying electronic keys for vehicles and not only.
2,The main purpose of MasterKeyIII device is programming and copying electronic keys for vehicles. If immobilizer ECU is available.
3,The device can also be used for repairing lost keys by the means of energy independent memory read. Also MasterKeyIII can generate prepared vehicles keys.
4,MK3 is the only one tool in the world can renew used keys for follow brand:
Cherysler
BMW
Kia& Hyundai
Toyota Smart Keys
Range Rover
GM & Opel Flip Keys
Especially Toyota and Lexus Smart key H Type, Even Tango do not have it. For example, Do Toyota H Type Smart key all key lost.
NOW MASTERKEY III IS WORKING WITH LOTS OF TRANSPONDERS SUCH AS:
Read-Only (Fixed-code)
MEGAMOS (13) (copy to T5, PCF7930, PCF7935)
PHILIPS (33) (copy to T5, PCF7930, PCF7935)
TEMIC (11) (copy to T5)
TEMIC (12) (copy to T5)?? MAZDA, MB Spriner
TEXAS (4C) (Read-Only; copy to Silca EH1, EH2 / Keyline Emulators) TOYOTA, FORD, etc.
Read-Write
MEGAMOS - CRYPTO - (48, 48M)
PHILIPS - CRYPTO - (40) OPEL
PHILIPS - CRYPTO - (42) VAG, FORD Galaxy
PHILIPS - CRYPTO - (44) VW
PHILIPS - CRYPTO - (45) PEUGEOT
PHILIPS - CRYPTO2 - (46)
T5 (for coping 11,12,13,33)
TEXAS - CRYPTO DST (4D) (ID 60,61,62,63,xx)
TEXAS - CRYPTO DST+ (4E) (ID 6)
Kindly Note:
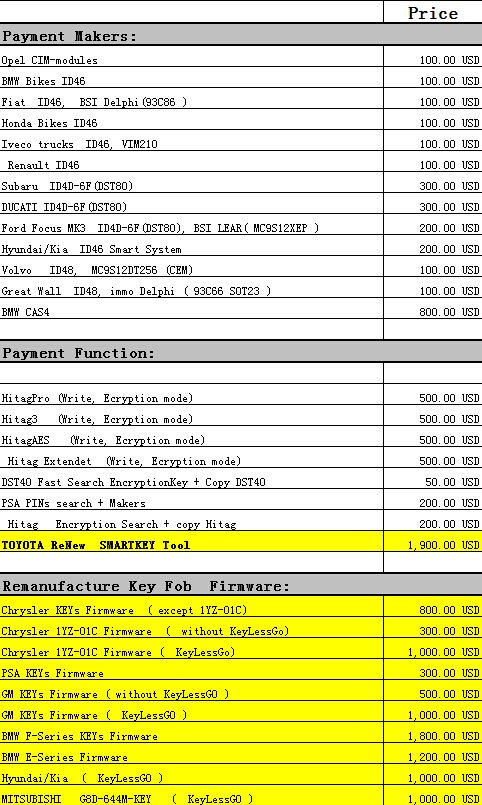
MasterKeyIII can not be sold to USA and CANADA. and this listing price is for the main unit of MasterKeyIII only. It's standard version not including any payable makers,payable functions, and payable Remanufacture Key Fob Firmwares. For different makers you can saw the price below.
Now you can get MasterKeyIII MK3 for only €1,834 in www.obd2express.co.uk.
To Get MK3 Key Programmer For 4 Reasons
1,The MasterKeyIII is a device and a software for programming and copying electronic keys for vehicles and not only.
2,The main purpose of MasterKeyIII device is programming and copying electronic keys for vehicles. If immobilizer ECU is available.
3,The device can also be used for repairing lost keys by the means of energy independent memory read. Also MasterKeyIII can generate prepared vehicles keys.
4,MK3 is the only one tool in the world can renew used keys for follow brand:
Cherysler
BMW
Kia& Hyundai
Toyota Smart Keys
Range Rover
GM & Opel Flip Keys
Especially Toyota and Lexus Smart key H Type, Even Tango do not have it. For example, Do Toyota H Type Smart key all key lost.
NOW MASTERKEY III IS WORKING WITH LOTS OF TRANSPONDERS SUCH AS:
Read-Only (Fixed-code)
MEGAMOS (13) (copy to T5, PCF7930, PCF7935)
PHILIPS (33) (copy to T5, PCF7930, PCF7935)
TEMIC (11) (copy to T5)
TEMIC (12) (copy to T5)?? MAZDA, MB Spriner
TEXAS (4C) (Read-Only; copy to Silca EH1, EH2 / Keyline Emulators) TOYOTA, FORD, etc.
Read-Write
MEGAMOS - CRYPTO - (48, 48M)
PHILIPS - CRYPTO - (40) OPEL
PHILIPS - CRYPTO - (42) VAG, FORD Galaxy
PHILIPS - CRYPTO - (44) VW
PHILIPS - CRYPTO - (45) PEUGEOT
PHILIPS - CRYPTO2 - (46)
T5 (for coping 11,12,13,33)
TEXAS - CRYPTO DST (4D) (ID 60,61,62,63,xx)
TEXAS - CRYPTO DST+ (4E) (ID 6)
Kindly Note:
MasterKeyIII can not be sold to USA and CANADA. and this listing price is for the main unit of MasterKeyIII only. It's standard version not including any payable makers,payable functions, and payable Remanufacture Key Fob Firmwares. For different makers you can saw the price below.
Wednesday, 20 April 2016
How to use E-sys 3.22.5 to add HO-Wort AMSA for VO coding CAS
This is aimted at guiding you to programm VO by adding HO-Wort, with BMW ENET cable.
this is done via ESYS 3.22.5 with ENET cable at www.obd2express.co.uk
adding HO-Wort OMSA and VO Coding CAS:
1.E-Sys => Expert Mode => Coding
2.Read FA => Name FA "OMSA.xml" => Save FA => Edit FA (FA Opens up in FA-Editor)
3.In FA, Right-Click on HO-Wort => New => HO-Wort
4.Add "OMSA"
5.Right-Click on FA at top of VO => Calculate FP
6.Verify in Vehicle Profile [x] Aftermarket_Fitment => [xxxx] OMSA_WITHOUT_ENGINE_START_STOP
7.Save FA
8.E-Sys => Expert Mode => Coding
9.Load modified "OMSA.xml"
10.Right-Click on FA => Activate FA
11.Read SVT (VCM)
Right-Click on CAS (the ECU itself not the underlying CAFD) => Select CODE.
this is done via ESYS 3.22.5 with ENET cable at www.obd2express.co.uk
adding HO-Wort OMSA and VO Coding CAS:
1.E-Sys => Expert Mode => Coding
2.Read FA => Name FA "OMSA.xml" => Save FA => Edit FA (FA Opens up in FA-Editor)
3.In FA, Right-Click on HO-Wort => New => HO-Wort
4.Add "OMSA"
5.Right-Click on FA at top of VO => Calculate FP
6.Verify in Vehicle Profile [x] Aftermarket_Fitment => [xxxx] OMSA_WITHOUT_ENGINE_START_STOP
7.Save FA
8.E-Sys => Expert Mode => Coding
9.Load modified "OMSA.xml"
10.Right-Click on FA => Activate FA
11.Read SVT (VCM)
Right-Click on CAS (the ECU itself not the underlying CAFD) => Select CODE.
Tuesday, 12 April 2016
How to use FVDI Read write MED17 EDC17
FVDI abrites commander for vag can read out the data of MED17, EDC17 engine control unit,can get 6-digit Security Byte and 5-digit login password by reading the data from MEDC17, and get 7-digit Security Byte by reading data from comfort modules.
What need to prepare for FVDI reading/writing MED17 EDC17?
PC, FVDI, USB cable, MEDC17 adapter, dongle, welding iron, solders, several 1K ohm resisters and 12V DC power supply.
(Note: refer to “medc17-pinout.pdf” that shows connections between MEDC17 adapter and MEDC17 ECU.)
Picture 1 shows connections between FVDI, PC, dongle, MEDC17 adapter. Your PC must be online.
How to read write MED17 EDC17 by FVDI?
Step 1: Disassemble MEDC17 ECU, uncover it.
Step 3: Connect FVDI with PC, open VAG 18.0, and enter special functions, and select “EDC17/MED17 Engine Control Unit”. It’s shown as picture 2.
Step 4: Select correct MCU type, and click “CONNECT” as Picture 3.
Step 5: Read what you want to read.
Step 6: Assemble MEDC17 ECU and install it to vehicle.
What need to prepare for FVDI reading/writing MED17 EDC17?
PC, FVDI, USB cable, MEDC17 adapter, dongle, welding iron, solders, several 1K ohm resisters and 12V DC power supply.
(Note: refer to “medc17-pinout.pdf” that shows connections between MEDC17 adapter and MEDC17 ECU.)
Picture 1 shows connections between FVDI, PC, dongle, MEDC17 adapter. Your PC must be online.
How to read write MED17 EDC17 by FVDI?
Step 1: Disassemble MEDC17 ECU, uncover it.
Step 3: Connect FVDI with PC, open VAG 18.0, and enter special functions, and select “EDC17/MED17 Engine Control Unit”. It’s shown as picture 2.
Step 4: Select correct MCU type, and click “CONNECT” as Picture 3.
Step 5: Read what you want to read.
Step 6: Assemble MEDC17 ECU and install it to vehicle.
Thursday, 31 March 2016
How to use Lauch EasyDiag OBDII reader
This is user manual of the Original Launch EasyDiag Bluetooth OBDII Code Reade for IOS Android, incuding how to log in, register and pay for EasyDiag software.

Step 1 - Log in software
Note: before operating, you need to log in software first. If your Android phone’s Bluetooth is closed, a request for Bluetooth will be seen once open the software

Select “yes” to turn on Bluetooth; or you can not communicate with EasyDiag
Look through these illustrations for a general understanding for the software
some precautions and warnings about using, read it carefully

click “I’ve read it” to enter login interface

Click “Login” to open login interface

For existing users, input your account to login. For new users, click
to register.

Input the necessary messages, and then click “Register and Login”

If you have a new connector need to registered, it is suggested to choose “Register Connector” item, once selected, the screen will jump into “Register Connector” page directly.
NOTE: When registration is successful, a confirm letter will be sent to your registered Email.
the interface after login

Click “read” to open quick start guide. And also you can open it in “More” item.
The software initial interface

1: Function selection list
2: Function extension button
3: Login button
4: Vehicle origin selection,
5: Car model selection area, the download icon means this car's diagnostic software has not been downloaded, if you want to diagnose it, click it to acquire the software.
6: Full screen display switch button
7: Partial display area
If you don’t have an EasyDiag, you can click DEMO icon to get into the demo function interface, and experience the vehicle diagnosis function
If you have already got a Lauch EasyDiag unit, please continue the registration.
Step 2 - Register connector
Plug the EasyDiag adapter into DLC socket and turn on the ignition switch.
Click “User Account” to enter the interface

Click “Register Connector”

Input Serial Number and verification code, then click “Register” to complete registration.
Note: the product Serial Number and verification code are available in the password envelope.


Step 3 - Acquire software
Before software download, please complete software acquisition
The download icon means the diagnostic software has not been downloaded, if you want to diagnose this car, please click it to acquire the diagnostic software.
Before purchase, you should select a product serial number

In the EasyDiag app, click the brand icon software which you want.
Take “ACURA” as an example.
Click “ACURA” icon

If only this software to be purchased, click “Add to cart”.
If you also want to add other software into the cart, close this page and select others add to shopping cart, also you can click “Software Package” to purchase software in packages or individually.
NOTE: Software package only supplies to individual regions.
Press “Create order” after software selection

Order list

After you click the space which marked in red circle, it would provide some useful information, such as diagnosis soft order name, order number, product serial number, total price, order status, and order time.
Please comfirm those information, and take a note about the order number which is the most important.

PAYMENT: You can select pay with PayPal or pay on website; here we choose the latter to illustrate how to pay. As for PayPal method, you can follow the on-screen instructions to complete.
After click button, the browser will automatic jump into LAUNCH user center login page.
Login with name and password, same as EasyDiag app login account.

order information, comfirm the order number

Click “PAY”

two options to pay, one is called “支付宝” for Chinese currency and the other one is “PayPal” for USD

a PayPal account is needed before you made the payment

login your PayPal account with your email address, and password, and click “continue”.

Pay sucess

DOWNLOAD: After made payment, please move back to EasyDiag application. And click the diagnosis software icon which have already paid

Take “DEMO” as an example, press “Check Download”.

Select HONDA, and start to download

Select “Download”.

Download until completed

Press”return” to back to the when diagnosis software download is completed, the download icon on the right bottom will disappear
Step 1 - Log in software
Note: before operating, you need to log in software first. If your Android phone’s Bluetooth is closed, a request for Bluetooth will be seen once open the software
Select “yes” to turn on Bluetooth; or you can not communicate with EasyDiag
Look through these illustrations for a general understanding for the software
some precautions and warnings about using, read it carefully
click “I’ve read it” to enter login interface
Click “Login” to open login interface
For existing users, input your account to login. For new users, click
Input the necessary messages, and then click “Register and Login”
If you have a new connector need to registered, it is suggested to choose “Register Connector” item, once selected, the screen will jump into “Register Connector” page directly.
NOTE: When registration is successful, a confirm letter will be sent to your registered Email.
the interface after login
Click “read” to open quick start guide. And also you can open it in “More” item.
The software initial interface
1: Function selection list
2: Function extension button
3: Login button
4: Vehicle origin selection,
5: Car model selection area, the download icon means this car's diagnostic software has not been downloaded, if you want to diagnose it, click it to acquire the software.
6: Full screen display switch button
7: Partial display area
If you don’t have an EasyDiag, you can click DEMO icon to get into the demo function interface, and experience the vehicle diagnosis function
If you have already got a Lauch EasyDiag unit, please continue the registration.
Step 2 - Register connector
Plug the EasyDiag adapter into DLC socket and turn on the ignition switch.
Click “User Account” to enter the interface
Click “Register Connector”
Input Serial Number and verification code, then click “Register” to complete registration.
Note: the product Serial Number and verification code are available in the password envelope.
Step 3 - Acquire software
Before software download, please complete software acquisition
The download icon means the diagnostic software has not been downloaded, if you want to diagnose this car, please click it to acquire the diagnostic software.
Before purchase, you should select a product serial number
In the EasyDiag app, click the brand icon software which you want.
Take “ACURA” as an example.
Click “ACURA” icon
If only this software to be purchased, click “Add to cart”.
If you also want to add other software into the cart, close this page and select others add to shopping cart, also you can click “Software Package” to purchase software in packages or individually.
NOTE: Software package only supplies to individual regions.
Press “Create order” after software selection
Order list
After you click the space which marked in red circle, it would provide some useful information, such as diagnosis soft order name, order number, product serial number, total price, order status, and order time.
Please comfirm those information, and take a note about the order number which is the most important.
PAYMENT: You can select pay with PayPal or pay on website; here we choose the latter to illustrate how to pay. As for PayPal method, you can follow the on-screen instructions to complete.
After click button, the browser will automatic jump into LAUNCH user center login page.
Login with name and password, same as EasyDiag app login account.
order information, comfirm the order number
Click “PAY”
two options to pay, one is called “支付宝” for Chinese currency and the other one is “PayPal” for USD
a PayPal account is needed before you made the payment
login your PayPal account with your email address, and password, and click “continue”.
Pay sucess
DOWNLOAD: After made payment, please move back to EasyDiag application. And click the diagnosis software icon which have already paid
Take “DEMO” as an example, press “Check Download”.
Select HONDA, and start to download
Select “Download”.
Download until completed
Press”return” to back to the when diagnosis software download is completed, the download icon on the right bottom will disappear
Friday, 25 March 2016
How to solve Kess V2 Bootloader adapter problems
Find a solution to fix Kess v2 clone bootloader adapter problems. Just put it here for sharing.
Device:
Kess v2 with ksuite 4.036 (China clone)
Symptom:
I am having problems with my bootloader adapter for Kess v2. Kess is reworked to 4.036 and works with OBD cable. I tried to use bootloader adapter and cable, but failed to read any ecu. I tried to connect EDC17CP14 (on the bench and without boot pin- obd mode on the bench), no luck with Kess (but my reworked Galletto worked with similar wiring ID + read OK).
I already checked the wiring in the cable connector- fixed some wires, but still nothing.
I think there may be something wrong in the bootloader unit.
4 steps to solve bootloader adapter problems:
Step 1- fixed the wiring
i fixed the wiring in the connector that goes into the bootloader module like in the picture (Ktag has the same) 4 wires were wrong in my connector.
Step 2- resoldered the mosfet
And I resoldered the mosfet (in the middle of the module- near the middle LED).
Step 3- read ECU without opening
I then got the power to the ecu. But it didnt read it, probably because I didn’t connect the boot pin (that needs to be soldered on the ecu pcb). I tried to read it without opening, because I borrowed the ecu.
Step 4- opened the ECU to read
So I finally got the time to test my bootloader module with all wiring (boot cable attached). Once I opened the ECU (edc17cp14) and connected the boot pin, I was able to succesfully Id and read the ECU.
Worked like a charm!
The main problem was the soldering of the mosfet transistor in the middle of bootloader pcb, and I remowed the extra wire that was on the other side of the pcb.
Hope this helps those with Kess V2 unit from China
(NOTE: This is a cutomer solution; please try and responsible for what you will do)
Device:
Kess v2 with ksuite 4.036 (China clone)
Symptom:
I am having problems with my bootloader adapter for Kess v2. Kess is reworked to 4.036 and works with OBD cable. I tried to use bootloader adapter and cable, but failed to read any ecu. I tried to connect EDC17CP14 (on the bench and without boot pin- obd mode on the bench), no luck with Kess (but my reworked Galletto worked with similar wiring ID + read OK).
I already checked the wiring in the cable connector- fixed some wires, but still nothing.
I think there may be something wrong in the bootloader unit.
4 steps to solve bootloader adapter problems:
Step 1- fixed the wiring
i fixed the wiring in the connector that goes into the bootloader module like in the picture (Ktag has the same) 4 wires were wrong in my connector.
Step 2- resoldered the mosfet
And I resoldered the mosfet (in the middle of the module- near the middle LED).
Step 3- read ECU without opening
I then got the power to the ecu. But it didnt read it, probably because I didn’t connect the boot pin (that needs to be soldered on the ecu pcb). I tried to read it without opening, because I borrowed the ecu.
Step 4- opened the ECU to read
So I finally got the time to test my bootloader module with all wiring (boot cable attached). Once I opened the ECU (edc17cp14) and connected the boot pin, I was able to succesfully Id and read the ECU.
Worked like a charm!
The main problem was the soldering of the mosfet transistor in the middle of bootloader pcb, and I remowed the extra wire that was on the other side of the pcb.
Hope this helps those with Kess V2 unit from China
(NOTE: This is a cutomer solution; please try and responsible for what you will do)
Tuesday, 22 March 2016
VVDI Prog Programmer 4.4.0 Test Results from Customers
The is customer feedback collections of VVDI Prog Programmer (2.2.0-4.4.0) at OBDexpress.
Feedback on http://www.obdexpress.co.uk/wholesale/vvdi-prog-vvdi-prog-super-programmer.html
VVDI Prog 4.4.0 on BMW cars
Cas 3 0L15Y read/write eep+flash ok
Cas 3+ 0M23S read/write eep+flash ok
Cas 2 2K79X read/write eep+flash ok
Program BMW CAS4+ All Key Lost...test ok
Read BMW CAS2, CAS3, CAS3+ and CAS4 ECU...test ok
Read BMW Engine ECU ISN...test ok
read out BMW 5 series CAS data
adds BMW CAS4 key
Can't find a way to read Cas 1 for E65 mask 0K50E
VVDI Prog on Mercedes Benz
W211 ezs 4L40K read/write eep+flash ok
VVDI PROG programmer 4.1.4 on Great Wall, Delphi
Read Great Wall Delphi EEPROM 93C66...test ok
Read 5M48H and common 8pin IC...test ok
VVDI Prog 2.2.0 on VW
The programmer read VW 44 IC EEPROM
Calculate password
VVDI Prog on MCU Motorola 912Xd256
MCU Motorola 912Xd256 unsecured it
read ok
eeprom and flash write ok
wont write new data on
always says erase error
eeprom flash not
VVDI Prog get PIN code of Ford, Nissan, Hyundai, VW
Ford password calculation (get Incode with Outcode)
calculate Nissan 20 digital PIN code
Calculate Hyundai PIN code by VIN
Load data to calculate VW PIN
Feedback on http://www.obdexpress.co.uk/wholesale/vvdi-prog-vvdi-prog-super-programmer.html
VVDI Prog 4.4.0 on BMW cars
Cas 3 0L15Y read/write eep+flash ok
Cas 3+ 0M23S read/write eep+flash ok
Cas 2 2K79X read/write eep+flash ok
Program BMW CAS4+ All Key Lost...test ok
Read BMW CAS2, CAS3, CAS3+ and CAS4 ECU...test ok
Read BMW Engine ECU ISN...test ok
read out BMW 5 series CAS data
adds BMW CAS4 key
Can't find a way to read Cas 1 for E65 mask 0K50E
VVDI Prog on Mercedes Benz
W211 ezs 4L40K read/write eep+flash ok
VVDI PROG programmer 4.1.4 on Great Wall, Delphi
Read Great Wall Delphi EEPROM 93C66...test ok
Read 5M48H and common 8pin IC...test ok
VVDI Prog 2.2.0 on VW
The programmer read VW 44 IC EEPROM
Calculate password
VVDI Prog on MCU Motorola 912Xd256
MCU Motorola 912Xd256 unsecured it
read ok
eeprom and flash write ok
wont write new data on
always says erase error
eeprom flash not
VVDI Prog get PIN code of Ford, Nissan, Hyundai, VW
Ford password calculation (get Incode with Outcode)
calculate Nissan 20 digital PIN code
Calculate Hyundai PIN code by VIN
Load data to calculate VW PIN
Subscribe to:
Posts (Atom)